How to Sharpen an EDC Knife at Home: Whetstone Angles, Burr Detection, and Strop Work
If your EDC knife is hitting the strop test and skating across paper instead of slicing it, you don’t need a new blade — you need a properly reset edge. Sharpening an EDC knife at home isn’t black magic, and it doesn’t require dropping $800 on a guided system. It requires understanding three things: the angle your edge actually wants, how to feel and confirm a burr, and the order you run your stones in. Get those right and a 20-minute session at the kitchen counter will put your Bugout, Para 3, or Bugout-clone back to slicing receipt paper cleanly.
This is the gear-nerd’s home sharpening playbook — written for people who already understand what S30V is and want to stop sending knives off to professionals every six months. We’ll cover freehand whetstones, guided systems, strops, and the steel-specific decisions that change how you should approach the edge.
Why Your Edge Went Dull (And Why It’s Not the Steel’s Fault)
Edges don’t usually fail because the steel gave up. They roll, deform, or microchip from lateral pressure during cuts — slicing cardboard at an angle, twisting through a zip tie, or that one time you used the spine of your Benchmade to scrape a sticker. The apex, which is only a few microns wide on a fresh factory edge, deforms long before the bulk of the bevel wears away.
This matters because most home sharpening sessions don’t need to reprofile the entire bevel. You’re realigning and re-apexing the last 50 microns of edge. That’s a 10-minute job on a medium stone, not an hour of grinding. Understanding the distinction between sharpening (refreshing the apex) and reprofiling (changing the entire bevel geometry) is what separates people who keep their EDC sharp from people who turn S35VN into a butter knife.
Pick Your Sharpening Philosophy
Before you buy stones, decide how much your hands want to learn. There are three real paths for home sharpening, and they have wildly different learning curves:
- Freehand whetstones — Cheapest long-term, infinite flexibility, steepest learning curve. Expect 20-30 hours of practice before you produce edges as good as the factory.
- Guided systems (Spyderco Sharpmaker, Lansky, Wicked Edge, KME) — Repeatable angles, fast results, limited blade geometry support. Best for users who own 3-6 knives and want consistency.
- Powered systems (Worksharp Ken Onion, Tormek) — Fastest, hardest to control, easy to overheat thin EDC blades and ruin heat treat. Use with caution on high-end steels.
If you’ve got one knife and want it sharp tomorrow, a Sharpmaker is foolproof. If you want a long-term skill and own a growing collection, learn freehand on stones. The path you pick determines everything else.
The Angle Question: What Your Steel Wants
The single biggest mistake people make is sharpening at the wrong angle. Pick too low and the edge chips on hard work. Pick too high and you’ve got a wedge that won’t slice. Most factory EDC knives ship with one of these inclusive angles (per side in parentheses):
- 30° inclusive (15° per side) — Common on Spyderco production. Aggressive slicer, less durable.
- 40° inclusive (20° per side) — Benchmade default. The all-purpose EDC sweet spot.
- 34° inclusive (17° per side) — Sharpmaker default. A reasonable compromise.
Match The Existing Bevel
Don’t fight the factory grind unless you have a reason to reprofile. Color the edge with a Sharpie, take two or three light passes on a medium stone, then look at the bevel. If the Sharpie comes off the apex evenly, your angle matches. If it only wipes off the shoulder, you’re too high. If it only wipes off below the apex, you’re too low. Adjust two or three degrees at a time. This single trick is worth more than any guided system on the market.
Steel-Specific Notes
S30V and S35VN tolerate 17-20° per side beautifully and take a screaming edge off SiC stones or diamond plates. M390 and 20CV are abrasion-resistant enough that you’ll want diamond — Arkansas stones will glaze and waste your evening. Budget steels like 8Cr13MoV, 14C28N, and AUS-8 sharpen on anything; they just don’t hold the edge as long. D2 is the troll — semi-stainless, abrasion-resistant, takes a coarse working edge better than a polished one. Match your stone choice to the carbide density of the steel and you’ll cut your session time in half.
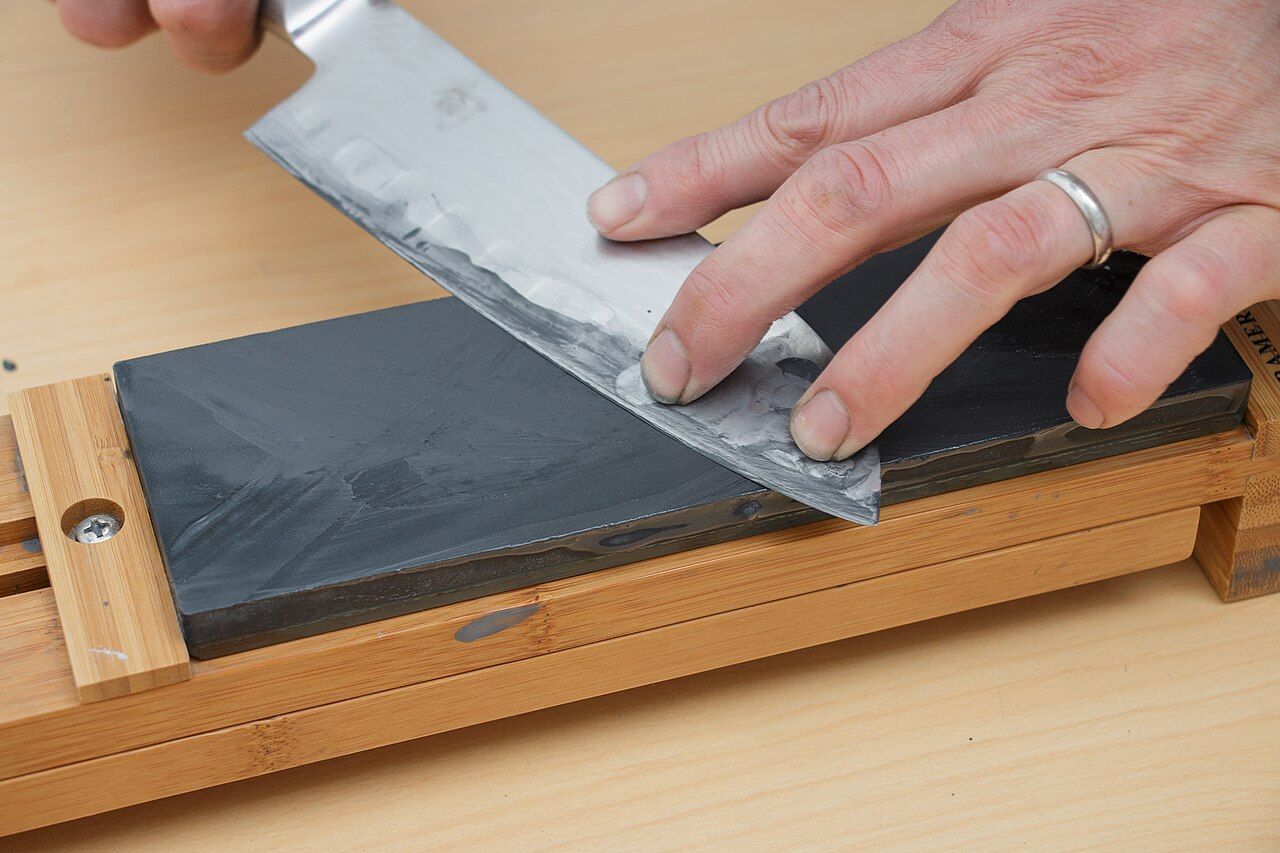
The Whetstone Workflow Step by Step
For a standard EDC touchup on something like a Para 3 or Bugout, you need three things: a medium stone (around 1000 grit), a fine stone (around 4000-6000 grit), and a strop. That’s it. Forget the eight-stone progression Instagram sharpeners post — it’s for chefs polishing kasumi finishes, not for keeping a folder slicing receipts.
- Soak waterstones if needed — 10 minutes for a King 1000. Diamond plates and oil stones go dry or with a few drops of cutting fluid.
- Sharpie the edge — Black marker the full bevel. This is your visual feedback loop.
- Find the angle — Lay the blade on the stone, lift the spine until the bevel sits flat, lock that wrist position.
- Set the burr on side one — Slow passes, edge-leading, applying light pressure with your off-hand fingers on the blade flat. Work from heel to tip. Check for a burr every 10-15 strokes by gently sliding a fingernail across the spine side of the edge — when you feel a consistent flap of metal along the entire length, you’re done with side one.
- Flip and burr side two — Same angle, same number of passes ratio. The burr will flip to the other side. Confirm by feel.
- Deburr on the medium stone — Alternating edge-leading passes, very light pressure, three or four per side. The burr should shear off cleanly.
- Refine on the fine stone — Same angle, light alternating passes. You’re not setting a new bevel — you’re polishing the one you already cut.
- Strop — 10-20 passes per side on leather with green compound. This is what takes a working edge to a hair-shaving edge.
The Burr: The One Thing Nobody Teaches Properly
The burr is the single most important diagnostic in sharpening, and it’s the thing beginners mistake for sharpness. When you grind metal away from one side of an edge, the steel deforms and folds over to the opposite side. That folded ribbon of metal is the burr. Its presence means you have ground all the way through the apex — congratulations, you’ve actually sharpened the knife. Its absence means you stopped short and the edge is still rounded.
You detect a burr by feel, not by sight. Run a fingernail or thumb pad gently down the spine side of the edge, perpendicular to the bevel. A clean burr feels like a tiny flap or roughness catching your skin. If you only feel smooth steel, keep grinding. If the burr is only on the heel third of the edge, your tip is still dull — keep grinding the tip section. Inconsistent burr formation along the edge length is the number one reason home sharpened knives end up with dead spots that won’t cut.
Stropping: The Step You Cannot Skip
A strop is just a piece of leather (or a hard substrate like balsa, denim, or kangaroo hide) loaded with abrasive compound. Green chromium oxide is the standard finishing compound and lives around 0.5 microns — fine enough to polish out the micro-serrations left by your finest stone. The strop does two jobs: it removes the last vestiges of the deburred apex, and it aligns the very edge of the steel.
Critical rule: stropping is spine-leading, not edge-leading. You drag the spine across the leather with the edge trailing. If you push edge-first into the leather, you’ll cut the strop and roll the edge. Light pressure — the weight of the knife is enough. 15 passes per side, alternating, takes a sharpened-but-not-screaming edge to one that tree-tops arm hair.
When a Guided System Earns Its Keep
The Spyderco Sharpmaker 204MF is the most cost-effective guided system on the market. It uses triangular ceramic rods at preset 15° and 20° per side angles and works on essentially any folder geometry. It won’t reprofile — it can’t, the rods don’t remove enough metal — but for maintenance touchups on EDC steels, it’s idiot-proof. If freehand has frustrated you twice in a row, buy one and stop bleeding edges.
Wicked Edge and KME systems clamp the blade and run abrasive stones on guided arms. They produce mirror polished edges with geometry that freehand can’t easily match — and they cost $300-$700+. Worth it for collectors and people who simply enjoy the toolwork. Overkill for one Bugout.
Mistakes That Wreck Edges
- Too much pressure on fine stones — You’ll dig into the binder and load grit into your edge. Light passes only above 1000 grit.
- Switching grits without confirming a burr — A finer stone can’t fix a missing apex. If you didn’t burr on the medium stone, you won’t finish on the fine stone either.
- Stropping at the wrong angle — Lifting the spine higher on the strop than on your stones rounds the apex. Match the angle, end of story.
- Overheating thin blades on belt sanders — Anything over about 150°F starts changing the heat treat of modern stainless. If the blade is too hot to hold, you’ve already cooked the temper.
- Sharpening the recurve on a flat stone — Recurves and emerson hawkbills need a round rod or the corner of a triangular stone.
A Realistic Maintenance Schedule
A daily EDC carrier opening packages, breaking down boxes, and doing light food prep should expect to strop weekly, hit a fine stone monthly, and visit a medium stone every 3-4 months. If you carry a polished M390 folder that rarely cuts harder than envelopes, that schedule stretches to twice-yearly stone work. If you actually use your knife on rope, drywall, or zip ties daily, you may need a medium-stone touchup every 6 weeks.
The pattern: strop early, strop often, and you’ll rarely need the stones at all. Most edges that get “dull” are actually rolled, and a strop straightens them in 60 seconds. Reach for the whetstone only when stropping stops bringing the edge back.
Final Notes on Building the Skill
Buy a $20 beater folder in 8Cr13MoV or AUS-8 and practice on it for a month before you touch your Para 3. Cheap steel sharpens easily and forgives your wrist wobbling at the wrong angle. Once you can reliably burr both sides of the cheap blade and shave arm hair off the result, you’ve earned the right to put your Bugout on the stone. Sharpening is a motor skill — it gets locked into your hands by reps, not by reading articles like this one.
Once you can sharpen freehand, you stop being a hostage to factory edges, mail-in services, and gimmick gadgets. You also stop buying new knives because the old one “doesn’t cut anymore.” That alone pays for the stones inside a year.